Tuesday, 2 July 2013

Dsiplaying 3D Polygon Animations


    Use examples to comprehensively explain the technology that allows us to display 3D polygon animations: graphics pipeline, e.g. modelling, lighting, viewing, projection, clipping, scan conversion, texturing and shading. Also research Radiosity & Ray tracing rendering techniques.
Graphics Pipeline
There are 7 stages to the graphics pipeline:
 
  • Lighting and shading - which makes lighting only at the vertices of the polygon which is being rendered.  There are three methods of shading, the first method is flat shading, this is simply one color for each polygon of the shape which is made up of squared polygons and will look more like a disco ball than a sphere, this means that the shape will look unrealistic, however this is a quicker way of processing the shape. The second method of shading is gouraud shading, this is kind of the same as flat shading however it calculates a color for each poly and created one for each verities  this means that there is a bit more color than flat shading, and it also looks a lot smoother, but this misses some of the effects in the lighting area. Finally, phong is the best way of shading, this is because it has more of a texture to it, it also looks more realistic than Gouraud and Flat shading, it is more accurate and brings out a more curvy sphere. However this slowers the processing speed for when you come to render it.

    • Clipping - which can be used for a 2D and 3D graphic could mean that in a 2D graphic you may clip the bottom half of the image in which will avoid going over the memory which is needed, where as in a 3D graphic for example, in a town scene there will include the main models, shaded and texture data making the size of the file massive, to reduce this by clipping you can render the graphic to make it smaller and as well to make the program run faster.
    • Projection - to make the camera smaller you can divide the x and y coordinates of each vertex by the Z coordinate which will represent the distance from the camera.
    • Viewing - this is a very simple transformation by simply applying a scale and a bias which is multiplying width and adding the offset from the screen origin.
    • Scan conversion - this is a wide subject in which it covers video projectors, television and cinema equipment. There are analogue and digital methods.


  • Texturing - this means the objects may look like they are bumpy, smooth, have color on them etc. Texturing is the wrap around the object which is like a cover for the object to make it look realistic, for example, the object may be one color at first and when rendered may look boring and plastic, however if you add a texture to it and then render it, it may look different and as though if you touched it, it will have a certain texture to it.

    Radiosity
    Radiosity describes a render which uses two types of lighting, theses lights are incident light and a reflective light, the reflective light simply reflects of the objects surface and the incident light hits onto the object. Radiosity is mainly used on interior designs.

    Ray Tracing
    Ray tracing is a type of render which renders out the image by casting out rays onto the scene, while this is being processed the color value of that pixel is being calculated, at the end of this technique it can produce very realistic renders, however it may take a long time to produce.


    Use examples to comprehensively explain the following Geometric terms: vertices; lines; curves; edge; polygons; element; face; primitives; meshes; wire-frame; surfaces.
    Vertices - this means corners of a polygon, the two lines that define a vertex and meet at each end point is a vertex.
    Lines - 
    Curves
    Edge - 
    Polygons - 
    Element - 
    Face - 
    Primitives - 
    Meshes - 
    Wire-Frame - 
    Surfaces - 

    Wednesday, 17 April 2013

    Research Task


    Research Task

    1. Explain the applications of 3D for product design, animations, TV, film, web, games, education, architectural walk-through.

    Product design:
    Product design is the development of ideas which will lead to new ideas, these ideas must be efficient and effective to the modern generation so that the product will sell, for example if the idea is of a new USB then the creator must make the USB attractive and uncommon therefore people will want this USB stick.
    here is an example of a product design, as you can see the product has been drawn first and then designed in which is possible the software 3D Maxx.

    Animations
    3D animations are now popular worldwide, the freeware packages in 3D animation are:

    • 3D Crafter which is a 3D modelling and animation tool which is available in a free version.
    • Autodesk 123D which is an entry to the 3D modelling market.
    • DAZ Studio which is a free  rendering tool which is set for adjusting parameters of already existing models.
    • DX studio which is the development of an environment  which creates interactive 3D graphics.
    A major 3D animation software is a programme called 3DS Max which is suitable for Microsoft Windows and Apple Macintosh, it is a 3D application which can be used in film, television, video games and architecture.


    TV and Film
    3D TV's have now come into the 21st century, they are now made from different company's such as LG and Sony, there is also a 2D mode for customers to watch their programmes normally instead of in 3D all the time. TV sales increased 50% when 3D TV's came out, there is also 3D Blu-ray DVD players for films to be played on because there is also 3D DVD's which are out and suitable to watch on 3D TV's with a 3D Blu-ray DVD player.


    There are also 3D films coming out in the cinema which have already been released in 2004 for example, monsters inc has just come out in the cinema in 3D, also Finding Nemo was re-released in 3D with no changes to the movie only the added effect of 3D making Pixar more money as people wanted to see it in 3D because it is more popular and people like the effect 3D has on them with the characters coming out of the screen.


    Web
    Google has created its own interactive 3D application called O3D, this application works on JavaScript library therefore it works on WebGL capable browsers. Unity 3D is supported natively in the chrome browser by a software called Google Native Client SDK which lets an even richer web based 3D gaming experience.


    Games
    For gaming there are  loads of programmes which are made to create a 3D game, the most popular software is 3DS Max which created Assassins Creed, along with the help of Ubisoft.
    Another game which also used 3DS Max was Harmonix's Dance Central for Xbox Kinect, they used the motionbuilder in this popular gaming software.


    Another 3D gaming application is also Unity this can be a lead on from 3DS Max, this software created applications for iPhone, iPod, blackberry's, online gaming and also PC gaming.
    Unity has created a game for iPod's and iPhone's called 'The Room' this game is a 3D game where the player is presented with a series of challenges which test observation, cleverness and deduction, it also created the hit game called 'Temple Run 1 & 2', this is one of the most popular mobile games ever created.


    Education
    The applications of 3D for educational purposes is an application called Designmate, this lets the person create 3D videos which uses animation to simplify the basic subjects such as maths, English and science.
    For example, for physics they may do animation on electric and magnetic properties showing the person how it works.


    Architectural
    The applications of 3D for architectural purposes are mostly for house design, the application software is called ARCON, this allows the person to view the home in a 2D and 3D standard, therefore seeing all prospects of the house.
    15.jpg

    2.Examine the technology that allows us to display 3D polygon animations: graphics pipeline, e.g. modelling, lighting, viewing, projection, clipping, scan conversion, texturing and shading. Also research Radiosity & Ray tracing rendering techniques
     
    Modelling
    In 3DS Max you can model your object how you want in  

    Lighting
     
    Viewing
    In 3DS Max there are 4 viewports to view your project from.
    Front Viewport
     
     Modeling a Frog in 3ds max
     
    Side Viewport

                                       Modeling a Frog in 3ds max

     Top Viewport

    Modeling a Frog in 3ds max

    These angles are to view your projects from different angles therefore making it easier for you to see where mistakes have been made and where there is room for improvement or a new feature. 
     
    Here is an example of how the viewports are viewed from a 3D angle, as you can see there are 3 main viewports which are wireframed and there is a viewport called perspective, this means you can view your project from all angles using the orbit subobject which is there to rotate around the object at any angle.
     
    Texturing
    In 3DS Max you have to texture a object to make it look effective when renderining it, texturization makes the object look more realistic.
     
    In this example, I am showing how the face of this person which was created in 3Ds Max looks realistc along with the eyes and creases in the skin tone.
     
    Shading


    Wednesday, 27 February 2013

    Monitor

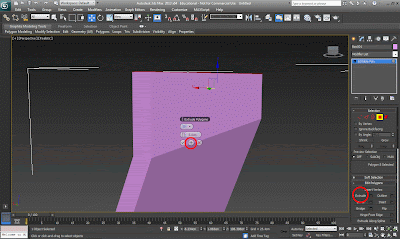
    In this printscreen, I am showing the making of the monitor, the circled icon is the polygon button, this allows me to select a particular side of a shape which is 4 or 3 sided. You can also delete certain sides, but then gain them back by clicking on 'CAP'.

    In this printscreen, I am showing how I am extruding the top of the what I have selected, by clicking on extrude it will duplicate the amount of time you click it, as well you can type how many times you would like it duplicating.

    In this printscreen, I am showing that the monitor has been created using extrude, bevel and insert.
    Bevel lets you extrude the faces of the shape, but then it also lets you shrink or largen the shape.
    Extrude lets you pull the shape up or down, inside or outside.

    Monday, 15 October 2012

    How to create a basic piece of Geometry

    Basic Piece of Geometry
     
    In this printscreen, I am showing how you start to make a basic shape in 3D Max, the red box on the printscreen is called the control panel this is where the options of shapes are, the basic shapes are:
    • Box
    • Sphere
    • Cylinder
    • Torus
    • Teapot
    • Cone
    • GeoSphere
    • Tube
    • Pyramid
    • Plane
    First of all you have to select the shape you would like, click the mouse in the perspective view and then click up again for this shape so then it has a 3D effect. This shape that I created is called a cylinder.

    Basic primitive

    In this printscreen, I am showing how to change the size of the shape made, as you can see where the red box is selected there is a selection of - height, length and width, also we can change the segments in this area as well. I am going to make the shape a perfect cube, which has a height, length and width of 50 and a lengthm width and height segment of 2.

    In this printscreen, I am showing that I have changed the name and the colour of the cube, the name of the cube is now called Purple Box, I did this in the selected area in the printscreen.
     
    In this printscreen, I am showing how to convert the object into a editable poly, I did this by right clicking on the object, going down to 'convert to' and then clicked on 'editable poly'.
     
    In this printscreen, I am showing how you can tell that it has now changed to a editable poly, you know this because it has whats in the  red box when you click on it.
     
    Editable Poly
     
    In this printscreen, I am showing how I am going to edit the vertex on the shape, this means I can modify where the segments are which means I can modify around the edges and the center of the shape. The red arrow above the shape is showing the blue dots showing where you are able to modify the shape.
     
    In this printscreen, I am showign how I have changed the shape and made the middle of the points come out therefore the shape now has points at the side of it.
    I did this by clicking on one of the blue dots and then dragging it out wards, i did this for all sides except for underneath and it resulted in this shape.

    In this printscreen, i am showing how to make the shape more smooth, I will do this by clicking on the drop menu which is named 'modifier list' and then scroll down to 'MeshSmooth', this will make the edges of the shape smooth and not so sharp.
     
    In this printscreen, I am showing how I have softened the edges of the shape, therefore the shape is no longer pointy and has smooth corners.


    Wednesday, 3 October 2012

    3DS MAX Viewports


    Cartesian Co-ordinate System

    Who?
    A french philosopher and mathematician called Rene Dascartes created 'cartesian co-ordiantes'.
    'I think therefore I am'
    
    This quote means  that you think for yourself therefore you are who you are.
    Rene Dascartes locked himself in a cabin then studied all the great philosophers there ever was.
     
    He as well invented a system of plotting space, which means he invented a system in which people could plot satalites in space.
     
    Why?
    He created cartesian co-ordinate system so that x and y axis will help to plot co-ordinates therefore you will be able to plot results onto a grid.
     
    How?
    The x axis is for horizontle and the y axis is for verticle.
    The circle in the middle of the lines is called the origin, this is where the co-ordinates (0,0) meet, this is where you start plotting the graph.
     
    The third dimention is the Z axis, this axis is for the depth.
     
    Viewports
    The 4 viewports are:
    • Top view - xy
    • Left viewport - yz
    • Front viewport - xz
    • Perspective Viewport - xyz
    The purpose of a viewport in 3Ds max is that you can view the creation from different angels therefore can see all of the creation and view it more advanced.
     

    Orthographic
    An orthographic view is a view in which is view from the Z axis.
    As y ou can see in the picture there is a chunk of the cube cut out there fore where the circle is it is measuring the depth